There is a sync tool that you can run on a computer in your network and it will synchronize user accounts in your Active Directory with user accounts in Brosix. You can get this tool from
https://secure.brosix.com/download/get/?nid=1&fid=BrosixLDAPSync
This tool needs access from the Internet to your Brosix data. To provide a high level of security there are some steps that have to be performed before you can use the sync tool:
- NET API is not enabled by default. Please go to the Web Control Panel – Settings – Options tab and enable it. Web Control Panel is available at net.brosix.com/
- Access to NET API is restricted to a limited number of IP addresses. Once NET API is activated for your IM network, please specify the IP addresses that are allowed to use NET API
- Provide a “Secret key”. It is used to authorize access to your NET API.
Once the NET API is enabled and configured the process of syncing is very easy. The sync tool can be used in two modes:
- Standard – opens a GUI wizard that guides you through the steps
- Command line – all the options are available in command line mode. You can set up a Scheduled Task and synchronize your Active Directory with Brosix every day.
NOTE: For security reasons Brosix LDAP Sync tool does NOT export user passwords from your Active Directory. This means your users’ passwords for their Active Directory accounts are secured. This also means that your user accounts on Brosix will have different passwords. For your convenience, Brosix LDAP Sync tool can automatically create a password for every user account it creates and sends the user an e-mail with the Brosix account credentials. The user can change the password at any time.
Standard
Start the application with an administrator account in the domain (or provide LDAP url and authentication):
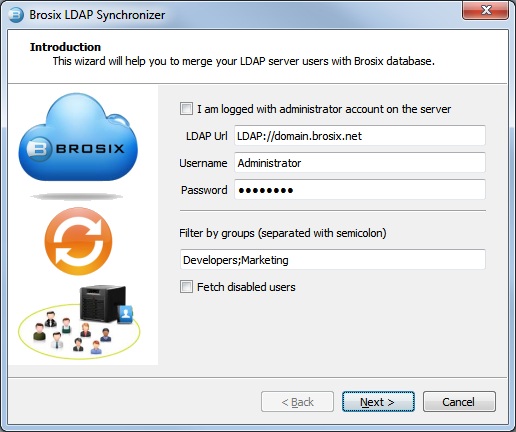
Brosix LDAP Sync Tool can synchronize all Active Directory accounts or only a group of users. For example, you can put all Active Directory users that you want to use Brosix in a group “brosix” and make the LDAP Sync Tool synchronize this group only.
1. To make Brosix LDAP Sync Tool synchronize one or several groups, enter their names in the “Filter by groups” field.
2. To make Brosix LDAP Sync Tool synchronize all user accounts from the Active Directory, leave the “Filter by groups” field blank.
If you check “Fetch disabled users”, accounts that are disabled in the Active Directory will also be synchronized with Brosix.
Then click Next and see a list of extracted users from the Active Directory domain:
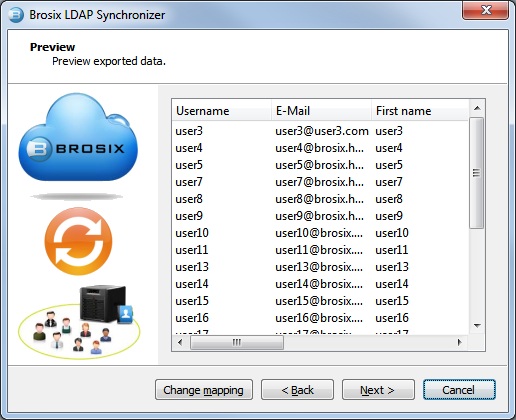
You can review and change the mapping between the columns extracted from LDAP and the columns in Brosix. To do so click the “Change mapping” button.
Click Next and provide your “network id” and “secret key”.
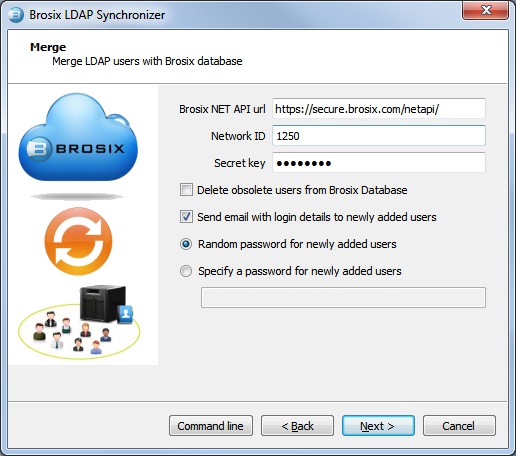
If you check “Delete obsolete users”, all user accounts that exist in Brosix and are not existing in your Active Directory will be deleted from Brosix. Please, note, that deleted accounts will completely lose their data including their chat history.
If you check “Send email to newly added users”, all user accounts that will be created in Brosix will receive e-mails with their account details: network number, account name, password, and a link to download the application.
Note
This wizard prepares the command line parameters for the settings and options you have chosen. You can use these parameters to set up unattended synchronization. For example, you can create a Windows Scheduled Task and synchronize your LDAP with Brosix every day. To get the parameters prepared by the wizard, click the “Command line” button.
Click Next to run the synchronization. When the sync completes you will see this screen:
Command line
Open a command line window and type
BrosixLDAPSync.exe /?
This will show all the available options. Now you can set up a Scheduled Task that executes BrosixLDAPSync.exe with the appropriate command line parameters.
You can run the application in Standard mode to prepare the command line parameters and then copy them to your script, .BAT file or a Windows Scheduled Task.